The Royal Recipes of Wonderland: Baking Recipes You Won't Believe
Good day and good eating to you dear reader,
It is I, Chef Rouxby the royal chef de cuisine at the Heart Castle and your most competent author of this fine bit of cookery know-how. Having survived being a chef to the Heart Queens for many seasons, I wish to pass on my knowledge to all who wish to enchant their tastebuds with the finest food ever Imagined.
I have been informed that this time of year on Earth is when the peoples of your realm gather to feast and make merry, how delightful. Seeing how a multi-course feast might be out of reach for a chef outside the various royal estates in Wondertropolis, I have set out an ideal appetizer, entree, and classic desert to delight any taster you entertain this Thanksgiving or holiday season.
A SAVORY STARTER OF FRIED DORMICE
The first course, or “appetizer,” is a first impression to the rest of your seasonal feasts. Far and wide, from the fine streets of Wondertropolis to the rough-n-tumble Boarderlands, there are few beasties that fry up as well as dormice. Now those without proper instruction may just fry the dormice whole and season simply, but for feastivi-teas we should be inclined to bring our best.
For the classy guests of Heart Castle, and those you invite into your own homes this season, one should not have to deal with such small bones & burnt whiskers. So, this recipe shall take pre-ground dormice, or the local hen or hog of your homestead, to make a delightfully fried croquette that will indulge your guests' desire for crispy goodness.
INGREDIENT LIST
The Filling
3 large potatoes, boiled and smashed
200grams or ½ a pound of ground dormice, or protein of your choice
1 small onion
1 teaspoon olive oil for frying the onion
1 teaspoon salt, or more to taste
½ teaspoon pepper, any color
The Breading
10 tablespoons of breadcrumbs, and extra if necessary
6 tablespoons of all-purpose flour
2 medium, or 1 large egg (from whatever beast you can safely retrieve an egg)
Salt & other seasonings to taste
Crispy Croquettes of Dormouse
STEP-BY-STEP INSTRUCTION
Begin by boiling your potatoes and coarsely smash them, no need to be dainty about it, and set them aside to cool while you prepare the other ingredients you may need to the rest of your feast.
Set a shallow pan over medium heat on your stove top. While that comes to heat, take your small onion, and dice it finely.
In the hot pan, add your olive oil then allow to cover your pan's surface and begin to “shimmer” like a mirror. Once suitably hot you may add your diced onions and stir regularly until the onions are translucent, you may add oil or butter if the pan begins to dry out.
After your pre-cooked ingredients have cooled, in a large bowl mix the mashed potatoes, ground dormice, diced onion, and seasonings. If you have the palate for it, some ground nut-of-meg and dry herbs like rosemary are popular in Earth realm cookery.
Thoroughly mix your ingredients, but do not over mix as the texture will become tough. The final croquette filling should be workable into small “dumpling” sized shapes for frying but not too sticky to the touch. Shape your dormouse filling into small ovals not to dissimilar from a dormouse's natural shape and set aside in your fridge-box until you are ready to fry.
Now is the time to prepare your breading station. Clean hands make quick work, so do avoid breading yourself by keeping one hand focused on dry ingredients and the other on your wet ingredients. In separate bowls; stage your flour, breadcrumbs, and eggs (which have been whisked with a tiny splash of water), as well as a cookie sheet or similar to place your breaded dormice.
First dust your dormice croquettes in flour, then egg wash, and finally into your breadcrumbs. Repeat the process until you've used up all your ground dormice mixture and prepare to fry.
In a suitable heavy-bottomed pot or deep pan, fill the vessel halfway with the frying oil of your choice and allow to come up to a frying temperature. You can test for this with a wooden skewer or “chop stick” which will have bubbles form up around the tip when submerged in the hot oil. Now you are ready to fry these delightful dormice, dear reader!
Carefully place a few “dormice” at a time in the oil with tongs or a similar utensil, flipping after 4 to 5 min, or until golden brown on all sides. It is best to have a plate lined with paper towels to place the freshly fried treats to dry out and be lightly salted immediately while hot.
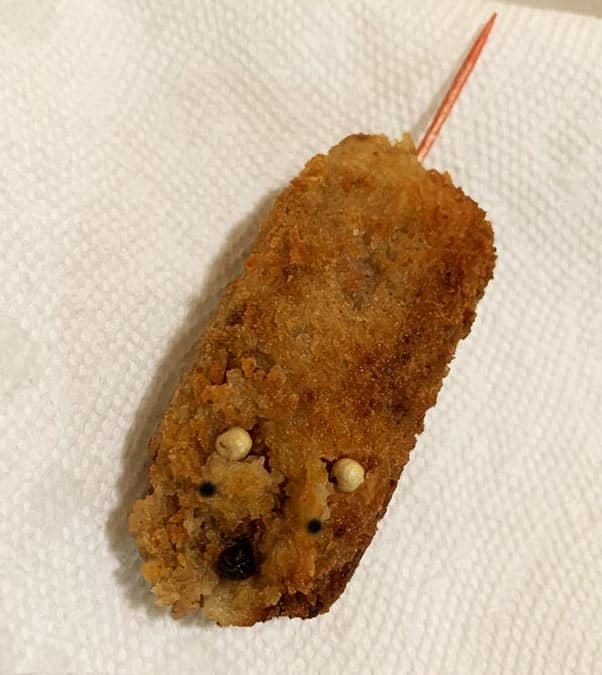
After the fried dormice have cooled enough to touch, roughly six or seven minutes, you can pierce the “bottom end” of your croquettes with toothpicks for ease-of-handling and to mimic the tails of the little morsels. Additionally, should you have the time & patience, an ambitious home cook may place sesame seeds to add eyes and a nose, completing the illusion!
Dormouse Decorated Croquette
AN ENTICING ENTREE OF ROAST TUTTLE-BIRD
Once all have settled around your table and the appetite is primed for the main course, you may stun your guests with an elegantly roast of tuttle-bird. In the lower parts of our fine community, a simple leg of tuttle-bird is common fair, but for this feastivi-tea we shall endeavor to prepare an entire roast. While this may seem a daunting task to you dear reader, rest assured that I shall guide you through this dish.
INGREDIENT LIST
The Tuttle-Bird
A 3.5 to 4 pound tuttle-bird, or an Earth bird of similar girth (perhaps a turkey or hen)
1 lemon
1 head of garlic
¼ cup of butter, or extra virgin olive oil
salt, to taste
pepper, to your liking
Tuttle-Bird Ready to Roast
STEP-BY-STEP INSTRUCTION
Before getting started remember to preheat your oven to 450 F (232 C)
Firstly, slice your lemon in half & deseed. Then slice your head of garlic in half along the middle, keeping the bulb together in two halves (top & bottom).
In a saucepan, microwave, or heating-crystal array, melt your butter.
On a cutting board (avoid wood as it is absorbent), pat your tuttle-bird dry to ensure the best crisping of the skin.
With the breast facing up and legs pointing toward you, use a sharp knife to slice through loose area of skin connecting the leg and breast. Continue cutting downward until you hit the joint that connects the thigh to the body, then stop (once through the skin, there’s not much there; if you are cutting through flesh, you’re too close to the breast). This exposes the leg joint, making it easy to tell if your roast is cooked. Repeat on second side.
Season every inch of your tuttle-bird, on the inside and out, under the wings and along the backbone. Do not be shy, the tuttle-bird sure isn't.
Place your tuttle-bird in a large, oven-safe skillet or sufficiently sized baking pan lined with aluminum foil. Arrange your lemon and garlic around the tuttle-bird.
Pour that golden elixir called melted butter all over the bird and move it into the oven.
Roast until the meat is nicely browned and cooked through, checking for doneness after 45 minutes. To check, carefully remove skillet from oven (the handle is hotter than the fury of Queen Redd—use caution!), poke a knife into leg joints, and pierce the meat.
If juices run clear, the bird is done. If you see a rosy, pink color, it needs more time. Continue to roast, checking every 5 minutes, until juices run clear.
Let the tuttle-bird rest in the skillet for 15 minutes before carving, this is the minimum weight time to avoid a bird so dry it will make you cry.
Once properly rested, you may carve this roasted tuttle-bird for your esteemed guests and enjoy alongside the various fresh sides local to your realm.
Delicious Roast Tuttle-Bird
A FRUITY FINALE OF TARTY TARTS
If there was ever a sweet treat more popular in Wonderland then I've certainly never heard of it; from afternoon tea to a Caterpillar's bribe, there is no finer a pastry to be had at any time or place. For those of you in the know, there are as many tarty tarts as there are tasters with tastes all their own and what we have here is merely one variation of this fine foodstuff.
While variety is the cinnamon-minnamon of life, for the unrefined home cook (unlike myself), this basic tarty tart shall be your looking glass into a whole Wonderland of pastry. By changing your berries with the season, or temper of your guests, this classic & simple tarty tart can elevate your tea parties and keep your head on its' shoulders.
INGREDIENT LIST
The Crust
1 cup plain (all-purpose) flour
1 tablespoon sugar
½ teaspoon salt
6 tablespoons of butter, very cold and cubed
1 egg, beaten to blend
The Filling
3/4 cup of ricotta cheese
3 large eggs
1 tablespoon of honey
¾ teaspoon of vanilla extract
1 tablespoon of lemon zest
A pinch of salt
Tart with Strawberries and Mint
STEP-BY-STEP INSTRUCTION
Whisk sugar, salt, and 1 cup flour in a medium bowl.
Add butter and rub in with your fingers until mixture resembles coarse meal with a few pea-size pieces remaining.
Drizzle egg over butter mixture and mix gently with a fork until dough just comes together.
Turn out dough onto a lightly floured surface and knead until smooth (a few dry spots are okay). Form dough into a disk. Wrap in plastic and chill until firm, at least 2 hours.
While your dough is resting dear readers, we shall be doing the opposite! In another bowl, gently mix your ricotta, eggs, and honey until you achieve an even mixture. Then add the vanilla, lemon zest, and salt, mixing for a final time.
When you are ready to assemble your tarty tart, do remember to preheat your oven to 350 F (176 C) and flour a clean surface to roll out your tart dough.
Roll out your dough with a well-floured rolling pin, if the dough cracks along its edges let it rest at room temp before attempting again.
Line your tart tin or pan, trimming the excess off the edges, and pricking the bottom with a fork to prevent bubbling.
The tart crust for this recipe should be “blind baked” for 10 to 15 minutes, keep your eye as oven heat can be fickle.
After your par-baked tart crust has rested for a few minutes after the blind bake you may add the filling in an even layer and return to the oven for another 15 minutes, or until the custard has set.
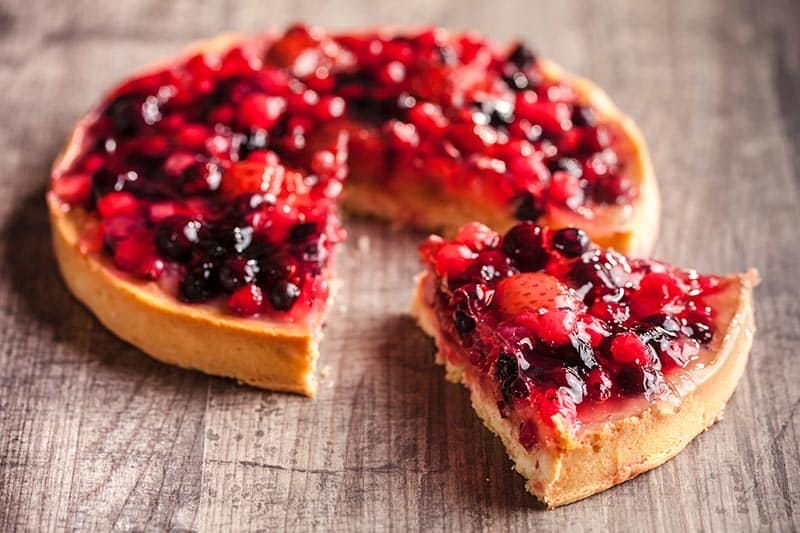
Once the tarty tart has completely cooled (patience is a chef's best tool in the kitchen), you can add a thin layer of flugelberry jam, or any fruit preserve in your realm that is tart and colorful.
Delicious Tart with Fruit Preserve Topping
FINAL THOUGHTS
Well dear readers, it is quite a testament to your skill & patience in the kitchen if you have made it this far in my recipe book. There is a lot of work involved in creating a feast that will keep your head on your shoulders, but is well worth the effort.
As much as it pains me to admit, these recipes are not written in stone and you are free to use your Imagination & know-how to adjust these recipes to your realm and tastes.
And do remember dear readers, that with the right imagination any meal is one worth celebrating.
Marco Arizpe graduated from the University of Southern California and The American Film Institute with degrees in filmmaking and screenwriting. His brand of borderland gothic horror stems from his experiences growing up in a small town where Texas and Mexico meet. Culturally steeped in a rich history of all things terrifying, Marco never fails to bring forward indigenous folklore in contemporary and fresh settings.